Using the Photoshop Pen Tool to create a Selection & Remove a Background
In this tutorial, I’ll demonstrate a great way to create a selection around an object to remove backgrounds, other objects, etc using the Photoshop Pen Tool.
I remember when I was new to Photoshop, selections and cropping, and then I remember how cool it was when I learned the Pen Tool and Quick Mask. I’m going to leave the Quick Mask for another tutorial and focus on the Pen Tool in this one, but I hope you enjoy my tutorial and learn something. Please let me know if I’ve helped!

OK, lets say that we want to remove the background from the image to the right (a quick one I grabbed from my portfolio – image not to scale). It’s a decent enough image, but maybe we want the model and bike to be black and white on a color parking lot or riding through space or something crazy like that.
First, we need to load up Photoshop and open the image. As a best practice, always either save a new copy right away or create a duplicate of the background layer and work on that duplicate with the original hidden.
The Pen Tool is, by default, located right above the type tool (see image).

Now that we know what we’re doing and what tool we’re using, lets begin.
A small note: this type of work can be made much, MUCH easier with a Wacom drawing tablet. I’ve got an Intuos 3, and it’s a life saver (I wouldn’t bother with the Bamboo line of tablets if you’re serious about graphics or photography).
The Pen Tool can be sort of tricky, as it allows you to create curves by clicking and dragging on subsequent points. To give you a better example, do this: Take the pen tool and click/release on any part of your canvas. Now, click on another part, but instead of releasing, simply drag the mouse any direction. You will notice a curve begin to form in the line between the first and second points. This is what makes the Pen Tool powerful for creating precise lines, curves and selections. You can also edit the already drawn curves by using the Direct Selection Tool (A) (the white pointer, not the black). By using this tool, you can click on any of the points or lines and either drag a line or drag a small “tail” that controls the scale and direction of the curve/line. Play around with this a bit before moving on.
We begin the actual editing by selecting a starting point. I’ll begin at the top of the wheel and work around. Keep in mind that it is usually wise to discard small sections of the background as you go so that you don’t get too far along, make a mistake, and have to revert and lose a bunch of tedious work.
Moving along, you can see me selecting the first section I want to discard in image 1 below. When you’ve finished that section of your selection by connecting the first and last point (simply click on the first point when creating the last), right click with your Pen Tool and click on “Make Selection” (image 2). A dialog box will pop up, but unless you want to feather the selection, etc, you can just hit “OK.” Now you’ve got the standard selection indicator box (image 3) – just hit Delete to get rid of everything in the selection (image 4).
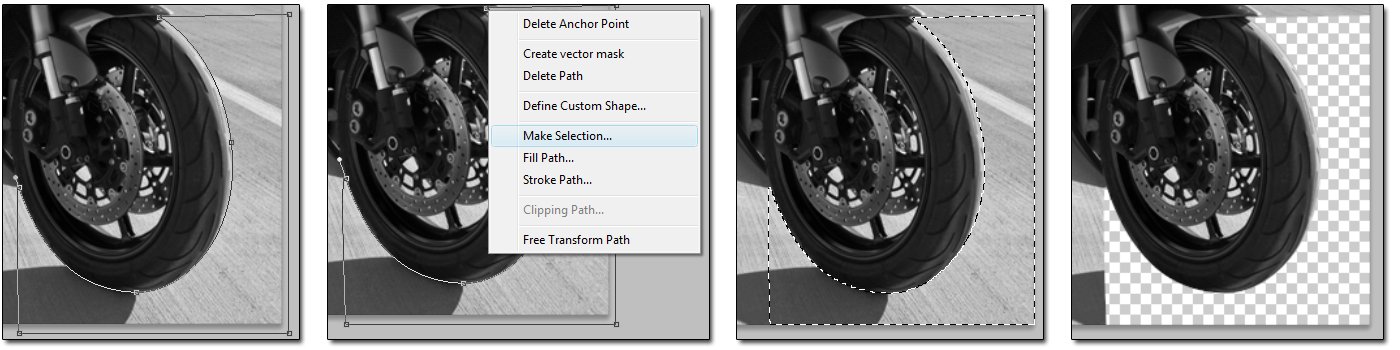
That’s it, or a start, anyway! You can continue around the image, selecting what you want to get rid of and removing it. Conversely, you can always select what you want to keep, make that area a selection, then right click and click on “select inverse” to delete everything in the image BUT what you want to stay.
The Pen Tool, along with Quick Mask and standard selection tools makes just about anything possible in the world of photo and graphic manipulation.
If you’ve read this far, I hope I’ve managed to help you and my explanations were clear. If not, please let me know and I can clarify anything that is misleading or hard to understand.
Thanks for reading, and good luck!
Good post, I just IMd the link to a buddy who was doing a little research on this. Thanks again.
cool
I am able to make the selection, but hitting delete doesn’t do anything. I am working on a mac with PS CS4. Thx
Hi Pim,
Please make sure that you have the correct layer selected that you are trying to delete the selection from (I do that all the time).
If you have the dotted selection line, it should delete. The only other thing I can think is that you may have not done the “Make selection” step, and it is still a pen stroke.
Hope you get it figured out!
Thanks for posting this I’m a bit unfamiliar with PS but good with AI and couldn’t figure this out. Simple “Make Selection” made producing a troll meme for my friend much easier 😀
Thank you so so much! This was so helpful x
Thank you
Excellent Tutorial, Thanks for your Great Help. Thanks for sharing such a nice article.